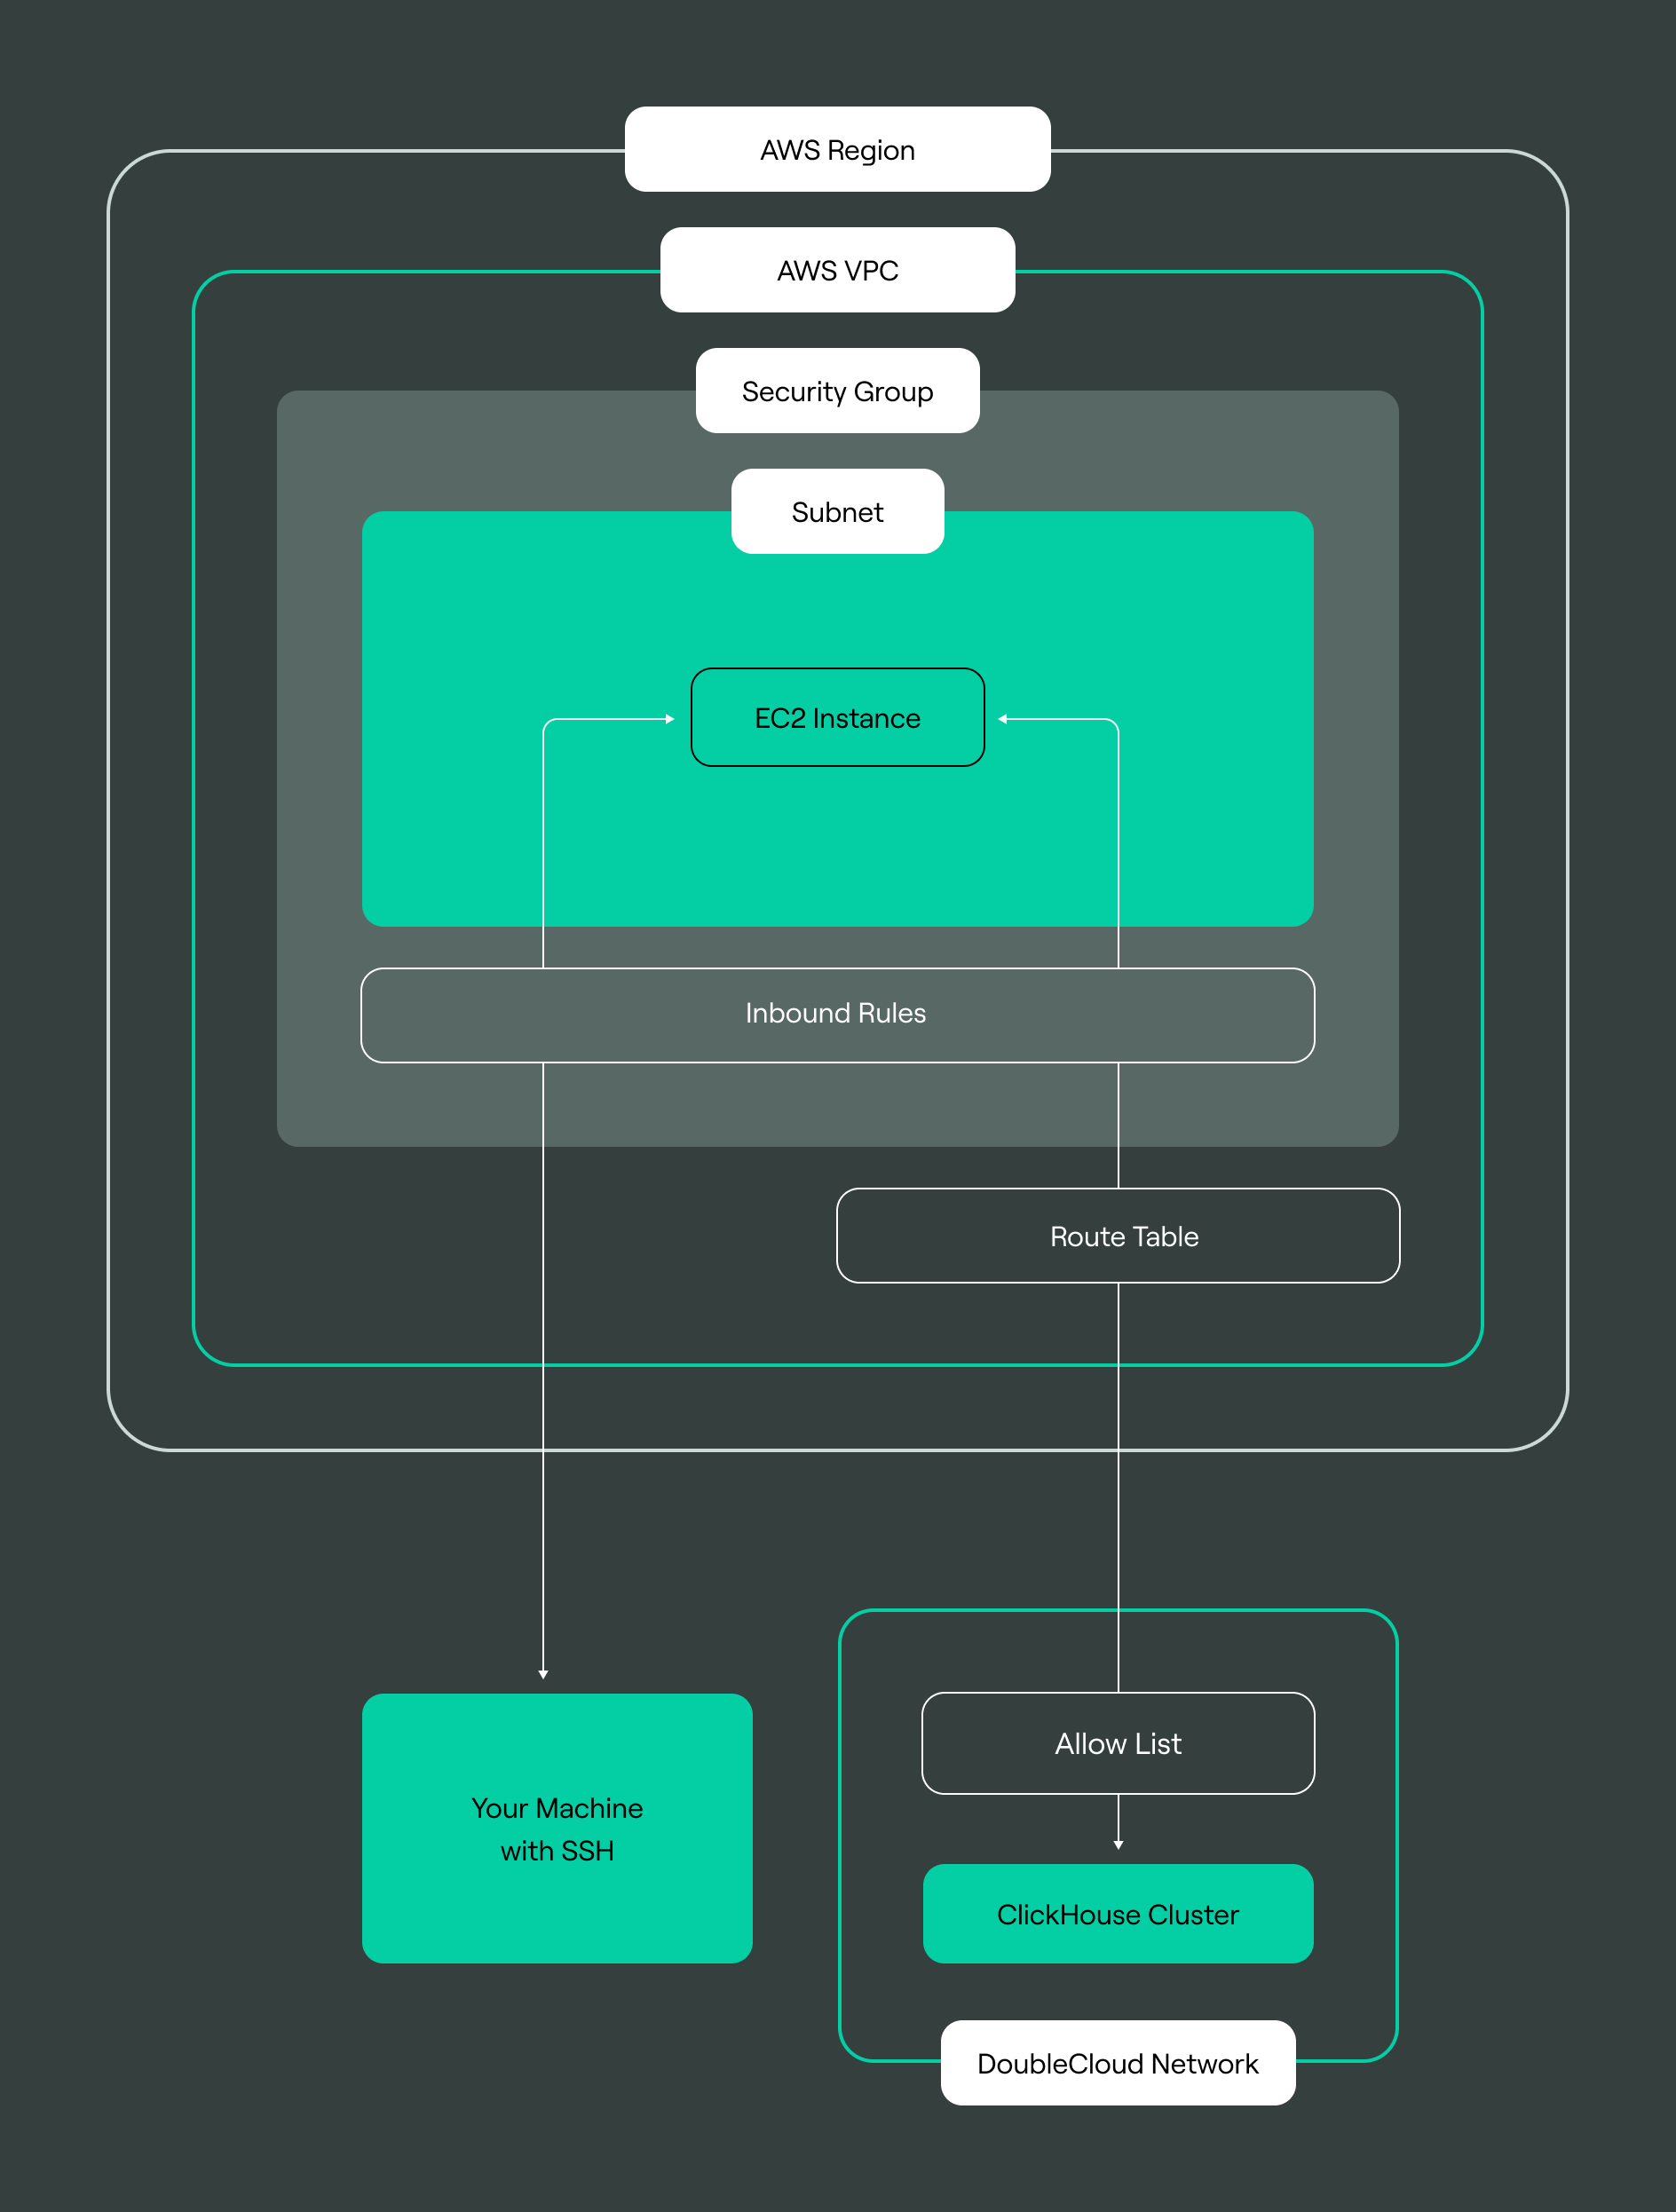
Access DoubleCloud resources with resources in your AWS VPC
This tutorial shows how to peer your DoubleCloud and AWS networks. Most sections describe AWS-specific actions such as the configuration of security groups, route tables, and the EC2 instance. For demonstration purposes, we will use a default VPC. The DoubleCloud network will contain a Managed ClickHouse® cluster and the AWS one will have an EC2 instance. At the final stage, we'll send a query from the EC2 virtual machine to the Managed ClickHouse® cluster to test the connection.
-
Create a Managed ClickHouse® cluster in a DoubleCloud network.
-
Use EC2 to connect the Managed ClickHouse® cluster in DoubleCloud.
Create a Managed ClickHouse® cluster and a DoubleCloud network
A network in DoubleCloud appears automatically when you create a resource. It can be one of the cluster type - ClickHouse® or Apache Kafka®. In this tutorial, we will create a Managed ClickHouse® cluster but won't perform any actions with it - we need it only for the network in a specific region.
-
Go to the Clusters page in the console.
-
Click Create cluster in the upper-right corner of the page.
-
Select ClickHouse®.
-
Choose
AWSas your provider. -
Select your cluster's region. This is an important point - you can only peer networks that belong to the same region. In this tutorial, we create a cluster in
N. Virginia: us-east-1region. -
Under Resources:
-
Select the
s2-c2-m4preset for CPU, RAM capacity, and storage space to create a cluster with minimal configuration. -
Choose the number of replicas. Let's keep it as is with a single replica.
-
Select the number of shards. Keep a single shard.
-
-
Under Basic settings:
-
Enter a cluster name, for example,
clickhouse-dev. -
From the Version drop-down list, select the ClickHouse® version the Managed ClickHouse® cluster will use. For most clusters, we recommend using the latest version.
-
-
Under Networking → VPC, select a VPC in DoubleCloud in which to locate your cluster. Make sure that you have the default value -
defaultinus-east-1. -
Click Submit.
Your cluster will appear with the Creating status on the Clusters page in the console. Setting everything up may take some time. When the cluster is ready, it changes its state to Alive.

Now you have a cluster in the us-east-1. Let's proceed to create an AWS VPC in the same region.
Inspect the AWS console
-
Open the AWS console .
-
Select the
US East (N. Virginia) us-east-1in the header:
-
Go to the AWS VPC service page .
-
From the list of options on the left, click Your VPCs under Virtual private cloud. This section lists the default VPC that we will use.
A default VPC has already attached and basically configured subnets, a security group, an internet gateway, and a route table. In this scenario, we will need only to configure the route table, and we leave other resources with their default configuration options.
Bind your AWS and DoubleCloud networks
-
Go to the Connections tab on the VPC page in the console.
-
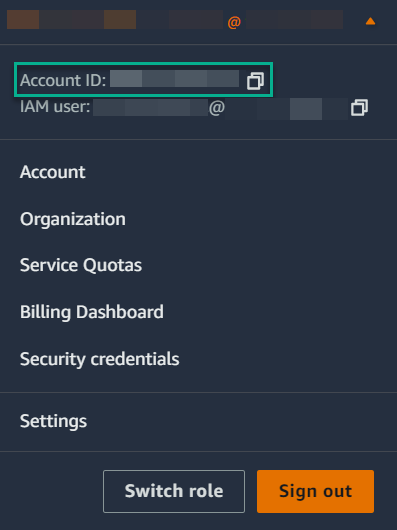
Specify the AWS account ID you want to connect to. You can find this numeric ID in the AWS console in the drop-down menu with your account information on the top panel on the right:
-
Specify the AWS VPC ID. In the AWS console, find your default VPC and copy its ID. It looks as follows:
vpc-xxxxxx. -
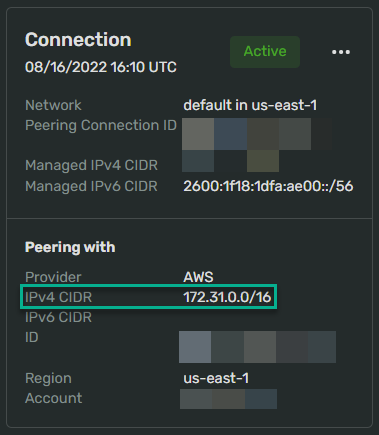
Provide your AWS IPv4 CIDR. You can find it on the right from the VPC ID in the AWS console.
-
Select your VPC Region -
US East (N. Virginia) us-east-1. -
From the drop-down menu, select your DoubleCloud Network to peer with.

-
Click Submit.
After you have created a connection, enable it on the AWS side. Note that it will take some time before the request appears on the AWS side.
Confirm peering on the AWS side
-
Go to the AWS VPC service page .
-
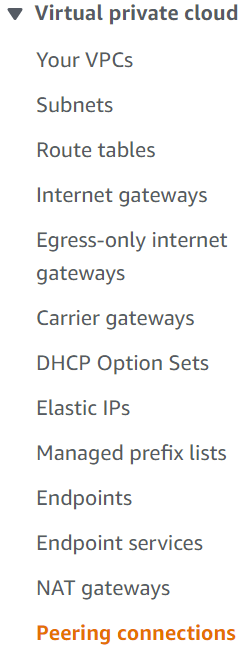
Go to the Virtual private cloud → Peering connections section in the menu on the left:
-
Click your VPC Peering connection ID and choose Actions → Accept Request.
-
In the confirmation dialog, choose Accept request.
At this point, you have successfully peered your AWS and DoubleCloud networks. Now it's time to add a route to the peered VPC.
Configure a route table
Route tables contain the rules called routes that define where to direct your network traffic.
We will use the default route table and add a route to the DoubleCloud VPC.
-
Go to the AWS VPC service page .
-
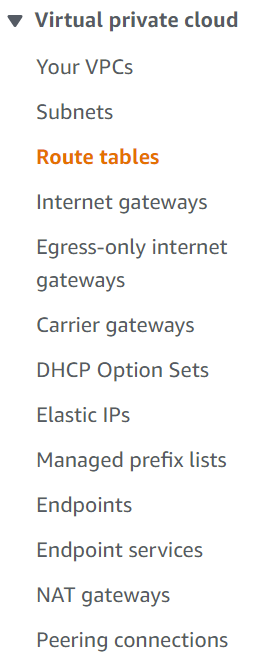
Open the Virtual private cloud → Route Tables section from the menu on the left:
-
Select a route table associated with the subnet you want to access clusters from.
-
In the Routes tab, click Edit routes.
-
Click Add route and specify its properties:
-
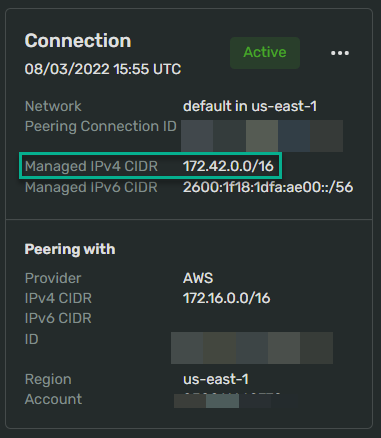
Destination to your DoubleCloud connection as a Managed IPv4 address in the CIDR notation:
-
Target is the ID of a peering connection in DoubleCloud. Click on this field, select Peering connection and then select your connection ID.
-
-
Click Save changes.
Add the AWS VPC CIDR to the Managed ClickHouse® allowlist
-
Go to the Clusters page in the console.
-
Select the
clickhouse-devcluster. -
Click the Allowlist tab.
-
Enter the CIDR of your AWS network from the Connections page in the DoubleCloud console:
-
Click Add.
Now you have fully connected your AWS and DoubleCloud networks. The traffic flow is also configured and you can proceed to creating a virtual machine in the AWS network to reach a resource in your DoubleCloud network.
Use EC2 to connect the Managed ClickHouse® cluster in DoubleCloud
Run an Ubuntu instance in EC2
For demonstration purposes, we will create a free-tier virtual machine with Ubuntu. It will be a server that we'll later use to reach a Managed ClickHouse® cluster in DoubleCloud.
-
Go to the AWS EC2 service page . Make sure that you are still in the same region — N. Virginia: us-east-1.
-
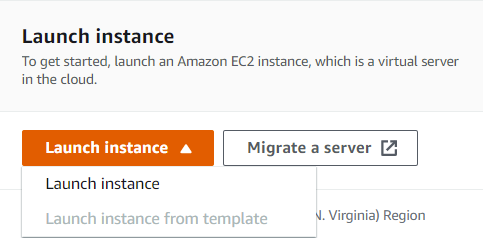
Click Launch instance → Launch instance:
-
Give a name to your server, for example
first-server. -
Select Ubuntu® with any available free tier.
-
Keep the Instance type default.
-
Use your Key pair or generate a new one. If you create a new key pair, follow the steps below:
-
Under Key pair name, specify the name of these keys -
tutorial-key-pair. -
Under Key pair type, select
RSA. -
Select .pem under Private key file format.
This scenario implies that you have a CLI SSH client. You can create a
.ppkkey if you prefer such tools as PuTTY . -
Click Create key pair. The file with your keys will be downloaded automatically. You will use this file later to establish an SSH connection to the instance.
-
-
Under Network settings, click Edit to specify the settings you have previously configured:
-
VPC
Select your VPC ID -
<vpc-xxxxxx>. -
Firewall (security group)
Switch to Select existing security group and select the default security group.
-
-
You aren't going to need other configuration options for this tutorial, so you can click Launch instance.
The result should be the following:

As soon as your instance comes alive, you'll be able to connect to it and reach the Managed ClickHouse® cluster. Click on the instance ID and go to its page.
Connect to the instance
We have everything set up and running. The connection between the networks is established, the Managed ClickHouse® cluster and the EC2 instance are running. Now you should connect to the instance to send a query to the Managed ClickHouse® cluster. You can choose any kind of connection provided by AWS depending on your account roles, but here we show the SSH way.
-
On the instance page, click Connect.

-
Select the SSH client tab.
-
Follow the instructions from this tab to check if your key is publicly viewable and get ready to run your SSH client.
Tip
Use the
chmodcommand to change the access mode to your SSH key if the key is too open. -
Navigate to the folder with your PEM key and run the following command with the information suggested on this page:
ssh -i "tutorial-key-pair.pem" ubuntu@<ec2-machine-address>.amazonaws.com -
Agree to establish the connection in the CLI and wait until you see something like this:
ubuntu@ip-172-31-20-0:~$
Access the Managed ClickHouse® cluster
Warning
When you connect to a cluster via a peering connection from VPC, you need to use a private address instead of the normally used public address.
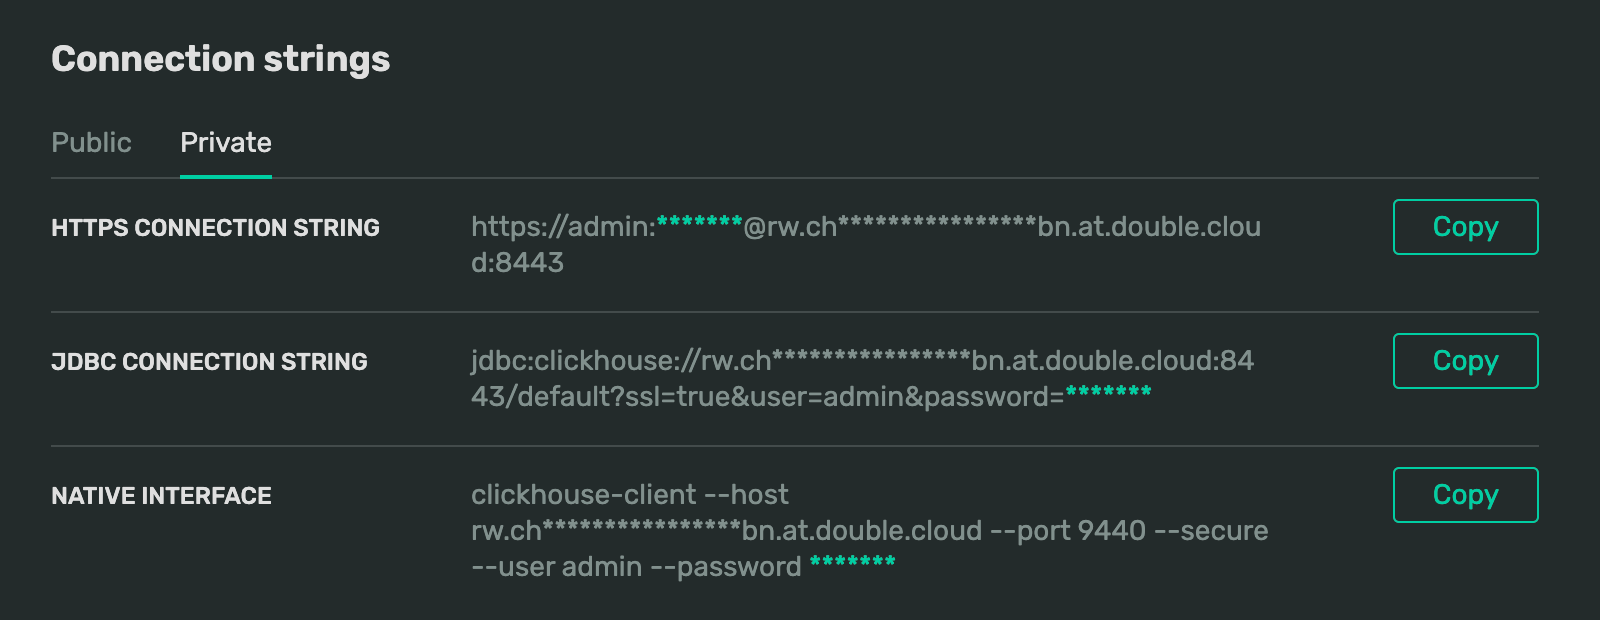
To obtain a cluster's private connection string, go to the cluster overview page. Under Connection strings, switch to the Private tab:
-
In your terminal with the SSH session, combine a query similar to the one below. You can find the ID of your cluster on the cluster's overview page. Make sure to add
privateto the resulting address:telnet rw.<cluster ID>.private.at.double.cloud 9440 -
If everything was configured correctly, you should see the following output:
Connected to <host>.<id>.private.at.double.cloud.
Escape character is '^]'.
This step concludes this scenario. In real use-cases, you are likely to use a similar flow with other resources, accessing them with Transfer or other data tools. Keep exploring!