Transfer data from a PostgreSQL RDS instance to ClickHouse®
This use case covers a scenario when you have a PostgreSQL database and want to use DoubleCloud to migrate data from it to a Managed ClickHouse® cluster and visualize it.
This tutorial shows how to peer your DoubleCloud and AWS networks. Most sections describe AWS-specific actions such as the configuration of security groups, route tables, and the RDS instance. For demonstration purposes, we'll use a default VPC for an AWS region. The DoubleCloud network will contain a Managed ClickHouse® cluster and the AWS one will have an PostgreSQL RDS instance from where we'll transfer data.
The process scheme is the following:

Tip
This tutorial shows the use of PostgreSQL in RDS. DoubleCloud also allows you to transfer data from Amazon Aurora in a similar way.
Step 1. Prepare a Managed ClickHouse® cluster
Step 1.1. Create a Managed ClickHouse® cluster
- Create a ClickHouse® cluster using a method of your choice.
Step 1.2. Connect to the cluster and create a database
-
Install the ClickHouse® client.
-
To connect to the cluster, open your terminal and run the following command:
DockerNative clickhouse-clientdocker run --network host --rm -it clickhouse/<Native interface connection string>The complete Docker command structure
docker run --network host --rm -it \
            clickhouse/clickhouse-client \
            --host <FQDN of your cluster> \
            --secure \
            --user <cluster user name> \
            --password <cluster user password> \
            --port 9440
<Native interface connection string> -
After you have connected to the cluster, create a database:
CREATE DATABASE IF NOT EXISTS db_for_postgresMake sure that the database has been created:
SHOW DATABASES┌─name───────────────┐ │ INFORMATION_SCHEMA │ │ _system │ │ default │ │ db_for_postgres │ // your database │ information_schema │ │ system │ └────────────────────┘
Step 2. Inspect the AWS console
-
Open the AWS console .
-
In the region dropdown in the header, select the US East (N. Virginia) us-east-1:

-
Go to the AWS VPC service page .
-
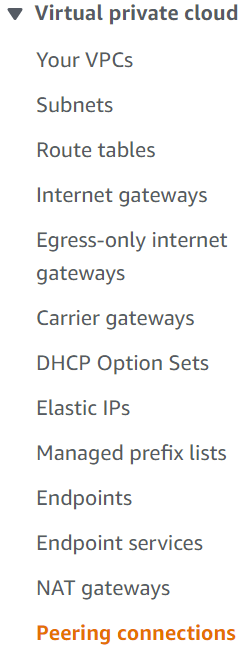
From the list of options on the left, click Your VPCs under Virtual private cloud. This section lists the default VPC that we will use.
A default VPC has already attached and configured subnets, a security group, and a route table. For this tutorial, you only need to configure the route table. Leave other resources with their default configuration options.
You'll place the RDS instance in the default VPC in the US East (N. Virginia) us-east-1 region.
Step 3. Peer AWS and DoubleCloud networks
Step 3.1. Create a peering connection in DoubleCloud
-
Go to the VPC page in the console.
-
Switch to the Connections tab and click Create connection.
-
Specify the AWS account ID, AWS VPC ID, and AWS IPv4 CIDR.
Where to find these values
-
AWS account ID: In the AWS console , open the dropdown with your account information.

-
AWS VPC ID: In the AWS console, find your default VPC and copy its ID. It looks the
vpc-xxxxxxxxxxxxxxxxxformat. -
AWS IPv4 CIDR: In the AWS console, it's to the right from the VPC ID.
-
-
In AWS VPC Region, select North America → N. Virginia us-east-1.
-
From the drop-down menu, select your DoubleCloud Network to peer with.

-
Click Submit.
After you've created a connection, enable it on the AWS side. Note that it will take some time before the request appears on the AWS side.
Step 3.2. Confirm peering on the AWS side
-
Go to the AWS VPC service page .
-
Go to the Virtual private cloud → Peering connections section in the menu on the left:
-
Click your VPC Peering connection ID and choose Actions → Accept Request.
-
In the confirmation dialog, choose Accept request.
At this point, you've successfully peered your AWS and DoubleCloud networks. Now it's time to add a route to the peered VPC.
Step 3.3. Configure a route table
Route tables contain the rules called routes that define where to direct your network traffic.
We'll use the default route table and add a route to the DoubleCloud VPC.
-
Go to the AWS VPC service page .
-
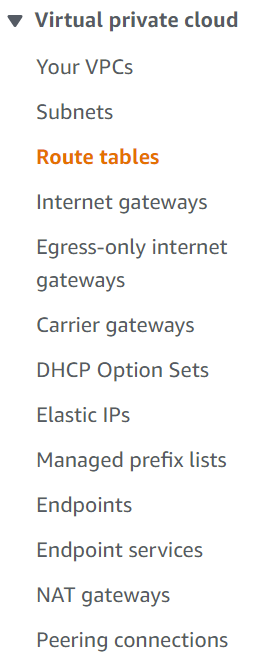
Open the Virtual private cloud → Route Tables section from the menu on the left:
-
Select a route table associated with the subnet you want to access clusters from.
-
In the Routes tab, click Edit routes.
-
Click Add route and specify its properties:
-
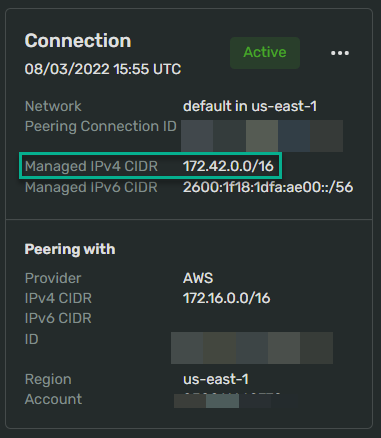
Destination to your DoubleCloud connection as a Managed IPv4 address in the CIDR notation:
-
Target is the ID of a peering connection in DoubleCloud. Click on this field, select Peering connection and then select your connection ID.
-
-
Click Save changes.
Now you've fully connected your AWS and DoubleCloud networks. The traffic flow is also configured and you can proceed to creating an RDS instance in AWS to transfer data from.
Step 4. Create a PostgreSQL RDS instance in a peered network
Step 4.1. Create an RDS instance
For this tutorial, you need a PostgreSQL database available from external networks.
Warning
Be sure to create a user with replication rights
in real scenarios
since it's necessary for the data transfer.
Note that we don't create a user in this scenario and transfer data under the root user postgres instead.
-
Go to the AWS RDS service page . Make sure that you are still in the right region -
N. Virginia: us-east-1. -
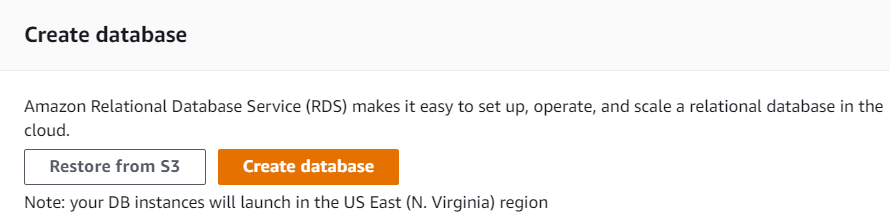
Click Create database → Create database:
-
Under Choose a database creation method, select Easy create.

-
Specify the following configuration properties:
-
Engine type: PostgreSQL
-
DB instance size: Free tier
-
DB instance identifier: enter the name for your instance, such as
dc-tutorial. -
Master username: enter the master username. You can leave the default value of
postgres. -
Check Auto generate a password. You'll see the password in the credential details after the instance is created. This is the only time when you can view this password.
You can also enter your own password instead of generating a new one.

Tip
If you expand the View default settings for Easy create section, you'll see that the instance will be created in the default VPC for the selected region. The instance is also located in the default subnet and is associated with the default security group.
-
-
Click Create database and wait until it's created. It usually takes a few minutes.
The RDS instance is created and running, but it also requires you to modify certain settings.
Step 4.2. Create a new parameter group for the database
Transfer requires you to set two parameters in the basic scenario to enable the logical replication. These parameters are rds.logical_replication and wal_level . To modify these parameters, create a separate parameter group:
-
In the left navigation menu, click Parameter groups:

-
Click Create parameter group.
-
On the Parameter group details, specify the settings:
-
Parameter group family: select the value that corresponds to your PostgreSQL version. In this tutorial, it's postgres13.
-
Type: DB parameter group
-
Group name:
tutorial-group. -
Description:
Parameters for the DoubleCloud tutorial.
-
-
Click Create.
After you've created the group, modify it:
-
Click on the group name in the groups list -
tutorial-group. -
Use the search box to find the
rds.logical_replicationparameter. -
Select it and click Edit parameters.
-
Expand the drop-down list in the Values column and select
1. -
Click Save changes.
As soon as you do it, the
wal_levelparameter, that's also required, will be automatically set tological.
When you have created the new parameter group, apply it to your RDS instance:
-
Click Databases in the navigation menu on the left:

-
On the databases overview page , click on your instance -
dc-tutorial. -
Click Modify in the top right corner.
-
Expand the Additional configuration section.
-
Under Database options → DB parameter group, select your parameter group — tutorial group.
-
Click Continue.
-
Under Scheduling of modifications, select Apply immediately.
-
Click Modify DB instance.
-
At this point, you've modified the parameters, but they're pending reboot. Do the following:
-
On the databases overview page, select your database.
-
Click Actions → Reboot:

-
Click Confirm to reboot your database and apply the parameter group change.
Wait a couple of minutes until the database status changes to
Available.
Step 4.3. Connect to the RDS instance
Now it's time to connect to your instance. In this tutorial, we use CLI tools, but you can use any tool of your choice.
-
On the databases overview page , click your instance name -
dc-tutorial. -
Make your instance accessible from external networks. They're not accessible by default.
-
Click Modify.
-
Under Connectivity, expand the Additional configuration section and select Publicly accessible.
-
Click Continue.
-
Under Scheduling of modifications, select Apply immediately.
-
Click Modify DB instance.
-
-
Install and use the PostgreSQL client:
DockerDEB-based-
Open your terminal.
-
(Optional) Start Docker if needed:
sudo service docker start -
Pull the postgresql-client Docker image:
docker pull jbergknoff/postgresql-client -
Connect to your database. Use the following properties:
-
The Endpoint field value from the database overview page as an address. It should start with your RDS instance name (
dc-tutorial) and end with.rds.amazonaws.com.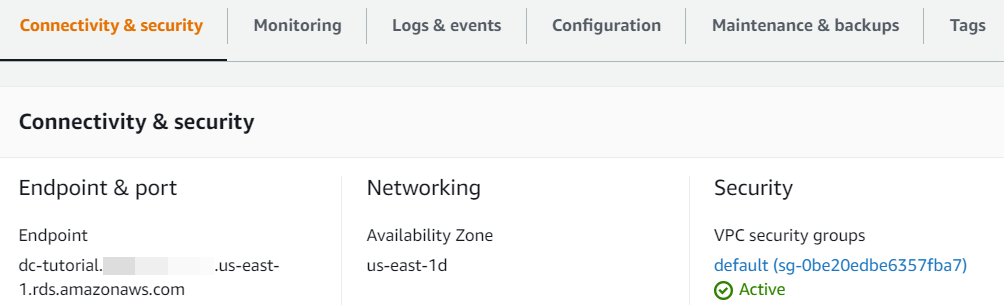
-
The 5432 port that is opened by default.
-
Your master user name (
postgresby default). -
The
-Wflag allows you to specify the password before sending a request to the server.
docker run -it --rm jbergknoff/postgresql-client \ postgresql://<username>:<Password>@<host address>:5432 -
-
Open your terminal.
-
Install the PostgreSQL client with the following command:
sudo apt install postgresql-client -
Connect to your RDS instance. Use the following properties:
-
The Endpoint field value from the database overview page as an address. It should start with your RDS instance name (
dc-tutorial) and end with.rds.amazonaws.com. -
The 5432 port that's opened by default.
-
Your master user name (
postgresby default). -
The
-Wflag allows you to specify the password before sending a request to the server.
psql -h <host address> -p 5432 -U <username> -W -
As soon as you see the following prompt in your terminal, the database is ready for operation:
postgres=> -
-
Check if all the required parameters are configured correctly. Connect to your database and execute the following query:
SELECT name,setting FROM pg_settings WHERE name IN ('wal_level','rds.logical_replication');name | setting ------------------------+--------- rds.logical_replication | on wal_level | logical
Step 4.3. Create a table and upload data
-
Create a table with the structure similar to the source dataset's structure. It must have a primary key, in this example it's the
order_idfield.CREATE TABLE sales_info ON CLUSTER default ( region text, country text, item_type text, order_date date, order_id int PRIMARY KEY, units_sold int, unit_price float(2), unit_cost float(2), total_revenue float(2), total_cost float(2), total_profit float(2) ); -
Finish the current terminal session by typing
\qor open a new terminal instance. -
Run the following command to fetch the data from our S3 bucket and copy it to the previously created table:
DockerDEB-basedcurl https://doublecloud-docs.s3.eu-central-1.amazonaws.com/data-sets/sales_info.csv \ | docker run -i --rm jbergknoff/postgresql-client \ postgresql://<username>:<Password>@<host address>:5432 \ -c "\copy sales_info FROM STDIN WITH (DELIMITER ';', FORMAT CSV, header);"curl https://doublecloud-docs.s3.eu-central-1.amazonaws.com/data-sets/sales_info.csv \ | psql -h <host address> -p 5432 -U <username> -W \ -c "\copy sales_info FROM STDIN WITH (DELIMITER ';', FORMAT CSV, header);" -
Send the
SELECTquery to check if the data is imported successfully:DockerDEB-baseddocker run -it --rm jbergknoff/postgresql-client \ postgresql://<username>:<Password>@<host address>:5432 \ -c "SELECT * FROM sales_info LIMIT 5;"psql -h <host address> -p 5432 -U <username> -W -c "SELECT * FROM sales_info LIMIT 5;"You should see the following output:
REGION │ COUNTRY │ ITEM_TYPE │ ORDER_DATE │ ORDER_ID │ UNITS_SOLD │ UNIT_PRICE │ UNIT_COST │ TOTAL_REVENUE │ TOTAL_COST │ TOTAL_PROFIT ----------------------------------+---------------------+-----------+------------+-----------+------------+------------+-----------+---------------+------------+------------- Central America and the Caribbean │ Antigua and Barbuda | Baby Food │ 2013-12-20 │ 957081544 │ 552 │ 255.28 │ 159.42 │ 140914.56 │ 87999.84 │ 52914.72 Central America and the Caribbean │ Panama │ Snacks │ 2010-07-05 │ 301644504 │ 2167 │ 152.58 │ 97.44 │ 330640.88 │ 211152.48 │ 119488.38 Europe | Czech Republic │ Beverages │ 2011-09-12 | 478051030 │ 4778 │ 47.45 │ 31.79 │ 226716.1 │ 151892.62 │ 74823.48 Asia | South Korea | Cereal │ 2010-05-13 │ 892599952 │ 9016 │ 205.7 │ 117.11 │ 1.8545912e+06 │ 1.0558638e+06 │ 798727.44 Asia │ Sri Lanka │ Snacks │ 2015-07-20 │ 571902596 │ 7542 | 152.58 | 97.44 | 1.1507584e+06 | 734892.5 | 415865.88 -
Press
qto exit the table view mode and then type\qto terminate thepsqlsession.
Step 5. Transfer the data
Now it's time to set up the tools to get the data from a remote source and transfer it to your database in the Managed ClickHouse® cluster.
Tip
Before you start configure Transfer, ensure that you have all the actions from the previous steps performed.
-
You have a Managed ClickHouse® cluster with the
db_for_postgresdatabase. -
You have a peering connection between your AWS and DoubleCloud networks.
-
Check the Connections page in the DoubleCloud console.
-
In the AWS console, check the settings of your peering connection for the
us-east-1region. -
Also check the route in your route table . It should point to your peering connection in DoubleCloud.
-
-
Check the settings of your RDS instance. Pay attention to the instance parameters.
-
On your instance's overview page, go to the Configuration tab and look for the Parameter group field. It's value should look as follows:
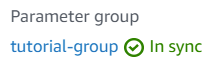
If you still have a default parameter group and it's in the Pending reboot status, reboot your instance.
- Ensure that the
rds.logical_replicationsetting in yourtutorial-groupparameter group is enabled.
-
-
After making sure that all the resources are created and settings have the correct values, proceed to the next step.
Step 5.1. Create a source endpoint
-
Go to the Transfer page in the console.
-
Click Create → Source endpoint.

-
Select
PostgreSQLas the Source type. -
Under Basic settings:
- Enter the Name of the endpoint:
rds-postgres.
- Enter the Name of the endpoint:
-
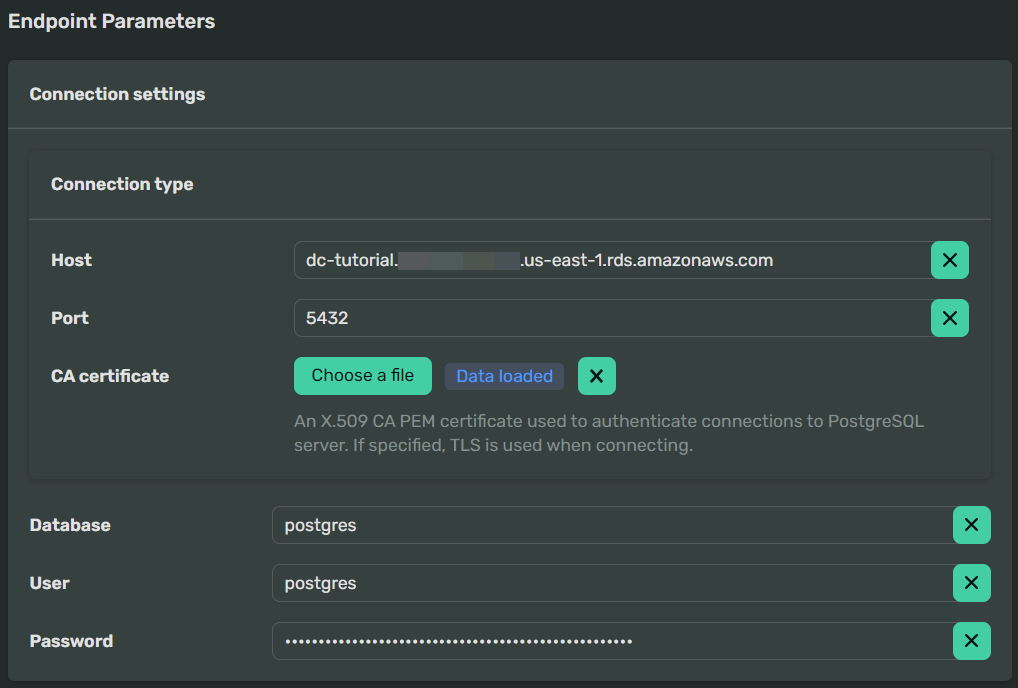
Specify endpoint parameters under Endpoint settings:
-
Under Connection settings → On-premise, specify the connection options:
-
IP or FQDN of the host. Paste the host address from the database overview page. It should start with your database name (
dc-tutorial) and end with.rds.amazonaws.com. -
Database port -
5432. -
CA certificate - upload the certificate as text or upload a file. You can obtain the certificate for your region on the corresponding AWS documentation page .
-
-
Enter the Database name. We use the default database
Postgresin this tutorial.How to list your RDS instance databases
-
Connect to your RDS instance as shown in the previous sections.
-
Type
\l.You should see the following output:
                                  List of databases
   Name    |  Owner   | Encoding |   Collate   |    Ctype    |   Access privileges
-----------+----------+----------+-------------+-------------+-----------------------
 postgres  | postgres | UTF8     | en_US.UTF-8 | en_US.UTF-8 |
 rdsadmin  | rdsadmin | UTF8     | en_US.UTF-8 | en_US.UTF-8 | rdsadmin=CTc/rdsadmin+
           |          |          |             |             | rdstopmgr=Tc/rdsadmin
 sales     | postgres | UTF8     | en_US.UTF-8 | en_US.UTF-8 |
 template0 | rdsadmin | UTF8     | en_US.UTF-8 | en_US.UTF-8 | =c/rdsadmin          +
           |          |          |             |             | rdsadmin=CTc/rdsadmin
 template1 | postgres | UTF8     | en_US.UTF-8 | en_US.UTF-8 | =c/postgres          +
           |          |          |             |             | postgres=CTc/postgres
-
-
Specify the Username of the user with the replication role. In this scenario, we've created the master user
postgres. -
Under Password, enter this user's password.
The filled-out form looks as follows:
-
-
Optionally, you can test your source endpoint:
-
Click Test connection.
-
Select the runtime type you want Transfer to use for connecting to the database.
-
Dedicated: Transfer connects to the database using a specified internal or external network.
-
Serverless: Transfer connects to the database available from the internet using an automatically chosen network.
Runtime compatibility warning
Don't use endpoints with different runtime types in the same transfer — this will cause the transfer to fail.
-
-
If you selected the dedicated runtime, select the network in the dropdown.

-
Click Test connection.
Testing the connection may take a few minutes.
-
-
Optionally, you can test your source endpoint:
-
Click Test connection.
-
Select the runtime type you want Transfer to use for connecting to the database.
-
Dedicated: Transfer connects to the database using a specified internal or external network.
-
Serverless: Transfer connects to the database available from the internet using an automatically chosen network.
Runtime compatibility warning
Don't use endpoints with different runtime types in the same transfer — this will cause the transfer to fail.
-
-
If you selected the dedicated runtime, select the network in the dropdown.
-
Click Test connection.
Testing the connection may take a few minutes.
-
-
Click Submit.
The transmitter is ready to go. We need to create an endpoint that will receive the data from a remote source.
Step 5.2. Create a target endpoint
-
Go to the Transfer page in the console.
-
Select the Endpoints tab, click Create endpoint → Target.
-
Select ClickHouse® as the Target type.
-
Under Basic settings:
-
Enter the Name of the endpoint:
target-for-postgres -
(optional) Enter a Description of the endpoint.
-
-
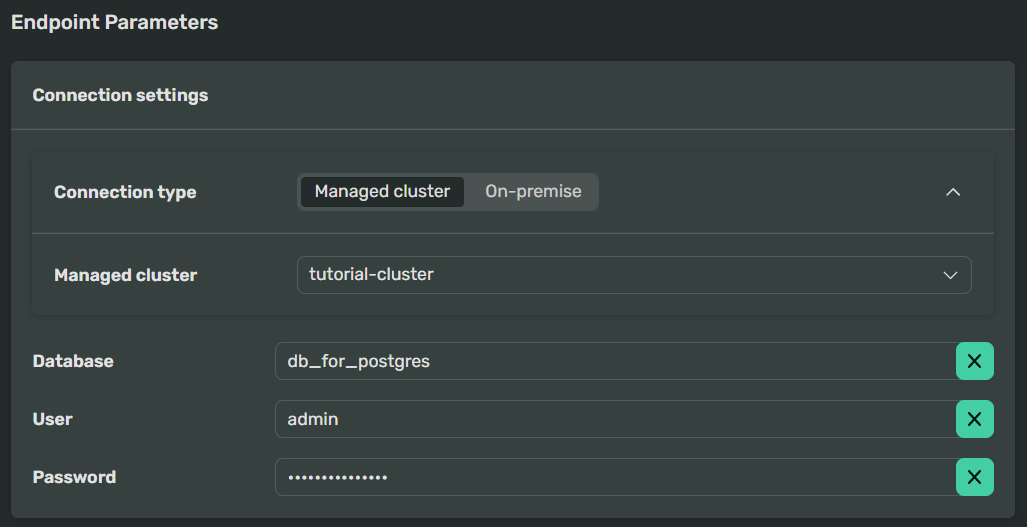
Specify endpoint parameters under Endpoint settings:
-
Select connection type. This tutorial transfers data to the Managed cluster.
-
Specify the connection properties:
-
Under Managed cluster, select your cluster name (
tutorial-cluster) from the drop-down list. -
Specify the User of the database:
admin. -
Enter the Password of the database user.
-
Specify the Database name you want to transfer the data to:
db_for_postgres.
-
-
Under Cleanup policy, select
Drop.
The filled-out form looks as follows:
-
-
Leave all the other fields blank or with their default values.
-
Click Submit.
Good work. We've created an endpoint that will receive and write the data to your Managed ClickHouse® database. All we need now is a tool that will connect both endpoints and transfer the data.
Step 5.3. Create and activate a transfer
-
Go to the Transfer page in the console.
-
Click Create → Transfer.
-
Under Endpoints:
-
In Source, select rds-postgres-source.
-
In Target, select target-for-postgres.
-
-
Under Basic settings:
-
Enter a transfer name, such as
postgres-to-clickhouse. -
(Optional) Enter a transfer description.
-
-
Under Transfer type, select Snapshot and replication.
-
Under Runtime environment, select Dedicated.
Tip
This runtime type is designed to transfer from peered networks. When you select this type, DoubleCloud allocates a dedicated virtual machine for your transfer.
-
Under Dedicated, set the virtual machine properties:
-
VM size: small. It allocates 2 CPUs to your virtual machine.
-
Minimum logging level: Warn. Learn more about logging levels
-
Settings: Automatic. In this tutorial, you created the Managed ClickHouse® cluster in the same region as the RDS instance. When you select the automatic settings, DoubleCloud creates an EC2 instance in the same region as the target cluster — US East (N. Virginia) us-east-1.
-
-
Leave all the other fields blank or with their default values.
-
Click Submit.
-
After you've created a transfer, click → Activate.
-
Wait until your transfer status changes to Done.
Now that Transfer has replicated the data, and you can connect to your Managed ClickHouse® cluster and run queries.
Step 6. Query data in the Managed ClickHouse® cluster
-
Open the terminal.
-
Send a query with the Native interface string from your cluster's Overview tab and type the following command:
DockerNative clickhouse-clientdocker run --network host --rm -it clickhouse/<Native interface connection string> --query="SHOW TABLES FROM db_for_postgres"The complete Docker command structure
docker run --network host --rm -it  \
            clickhouse/clickhouse-client \
            --host <FQDN of your cluster> \
            --secure \
            --user <your cluster username> \
            --password <Cluster user password> \
            --port 9440
            --query="SHOW TABLES FROM db_for_postgres"
<Native interface connection string> --query="SHOW TABLES FROM db_for_postgres"The complete structure of the Native interface connection string
clickhouse-client --host <FQDN of the host> \
                  --secure \
                  --user <Cluster user name> \
                  --password <Cluster user password> \
                  --port 9440
The output will contain the
sales_infotable from the PostgreSQL RDS database. It has thepublicprefix from the PostgreSQL schema.┌─name─────────────────────┐ │ public_sales_info │ └──────────────────────────┘ -
Let's send a
SELECTquery to thepublic_sales_infotable:DockerNative clickhouse-clientdocker run --network host --rm -it clickhouse/<Native interface connection string> --query="SELECT * FROM db_for_postgres.public_sales_info LIMIT 20"The complete Docker command structure
docker run --network host --rm -it  \
            clickhouse/clickhouse-client \
            --host <FQDN of your cluster> \
            --secure \
            --user <your cluster username> \
            --password <Cluster user password> \
            --port 9440
<Native interface connection string> --query="SELECT * FROM db_for_postgres.public_sales_info LIMIT 20"The complete structure of the Native interface connection string
clickhouse-client --host <FQDN of the host> \
                  --secure \
                  --user <Cluster user name> \
                  --password <Cluster user password> \
                  --port 9440
This query returns the same data you previously had in the PostgreSQL database with additional technical columns:
┌─order_id──┬─region────────────────────────────┬─country────┬─item_type──┬─order_date───────────┬─units_sold─┬─unit_price─────────┬──────────unit_cost─┬─total_revenue─┬─────total_cost─┬────total_profit─┬─data_transfer_commit_time─┬─data_transfer_delete_time─┐
│ 100640618 │ Europe                            │ Norway     │ Cereal     │ 2014-10-08T00:00:00Z │        650 │  205.6999969482422 │ 117.11000061035156 │        133705 │        76121.5 │         57583.5 │       1656595919141050000 │                         0 │
│ 101315677 │ Sub-Saharan Africa                │ Mali       │ Vegetables │ 2013-11-07T00:00:00Z │        415 │ 154.05999755859375 │  90.93000030517578 │ 63934.8984375 │ 37735.94921875 │ 126198.94921875 │       1656595919141050000 │                         0 │
│ 103258454 │ Middle East and North Africa      │ Azerbaijan │ Baby Food  │ 2017-06-28T00:00:00Z │       5326 │ 255.27999877929688 │  159.4199981689453 │    1359621.25 │    849070.9375 │      510550.375 │       1656595919141050000 │                         0 │
│ 103281629 │ Sub-Saharan Africa                │ Botswana   │ Vegetables │ 2013-10-19T00:00:00Z │       2184 │ 154.05999755859375 │  90.93000030517578 │  336467.03125 │     198591.125 │   137875.921875 │       1656595919141050000 │                         0 │
│ 103832662 │ Europe                            │ Croatia    │            │                      │       5247 │ 255.27999877929688 │  159.4199981689453 │   1339454.125 │      836476.75 │    502977.40625 │       1656595919141050000 │                         0 │
│ 104650199 │ Sub-Saharan Africa                │ Seychelles │ Cereal     │ 2014-08-20T00:00:00Z │       7174 │  205.6999969482422 │ 117.11000061035156 │    1475691.75 │     840147.125 │     635544.6875 │       1656595919141050000 │                         0 │
│ 105630385 │ Central America and the Caribbean │ Saint Ki
Great job! You have successfully transferred data from and RDS instance to the Managed ClickHouse® cluster. See the links below to find more info about each used service we used in this scenario.